Job aid · Northern Illinois University
AT Station Quick Reference Guide
Keyboard commands and settings for the screen reader, magnifier, and scanning software on the campus assistive technology workstations.
What it is: A quick reference guide for the assistive technology (AT) workstations in Northern Illinois University's computer labs. I wrote it for the lab staff who helped students use screen readers, magnifiers, and scanning software.
Tools covered: Windows keyboard access, JAWS for Windows, MAGic, and OmniPage Pro, at the versions in use when it was written.
Showing all keystrokes.
Windows keystrokes
| Action | Keystroke |
|---|---|
| Get Help | F1 |
| Open the Start menu | Ctrl+Esc or Windows |
| Open Windows Explorer | Windows+E |
| Open Run Dialog | Windows+R |
| Find File or Folder from Desktop | F3 |
| Minimize All Applications | Windows+M |
| Switch between open applications | Alt+Tab |
| Quit the active application | Alt+F4 |
| Action | Keystroke |
|---|---|
| Open the application control menu | Alt+Spacebar |
| Move to the Menu bar in application | Alt |
| Choose a Menu item | Enter |
| Move between menus | Alt, Arrow keys |
| Cancel or close a menu | Esc |
| Cancel or close a cascading menu | Alt |
| Close a child window | Ctrl+F4 |
| Open the applications menu | Application or Shift+F10 |
| Action | Keystroke |
|---|---|
| Move through dialog controls | Tab |
| Move backward through dialog controls | Shift+Tab |
| Move to another page | Ctrl+Tab |
| Reverse direction through pages | Ctrl+Shift+Tab |
| Select or deselect in list view | Spacebar or Ctrl+Spacebar |
| Toggle a check box on/off | Spacebar |
| Action | Keystroke |
|---|---|
| Delete files | Delete |
| Rename a file or folder | F2 |
| Open Properties for Selected File or Folder | Alt+Enter |
| Refresh a window | F5 |
| Switch between windows | F6 or Tab |
| Go up one level | Backspace |
| Action | Keystroke |
|---|---|
| Move One Character Left | Left Arrow |
| Move One Character Right | Right Arrow |
| Move One Word Left | Ctrl+Left Arrow |
| Move One Word Right | Ctrl+Right Arrow |
| Move to Beginning of Line | Home |
| Move to End of Line | End |
| Move One Paragraph Up | Ctrl+Up Arrow |
| Move One Paragraph Down | Ctrl+Down Arrow |
| Scroll up one screen | Page Up |
| Scroll down one screen | Page Down |
| Move to Beginning of Document | Ctrl+Home |
| Move to End of Document | Ctrl+End |
| Action | Keystroke |
|---|---|
| Copy | Ctrl+C |
| Cut | Ctrl+X |
| Paste | Ctrl+V |
| Undo | Ctrl+Z |
| Delete current character | Delete |
| Delete prior character | Backspace |
| Select One Character Left | Shift+Left Arrow |
| Select One Character Right | Shift+Right Arrow |
| Select One Word Left | Ctrl+Shift+Left Arrow |
| Select One Word Right | Ctrl+Shift+Right Arrow |
| Select to Beginning of Line | Shift+Home |
| Select to End of Line | Shift+End |
| Select to beginning | Ctrl+Shift+Home |
| Select to end | Ctrl+Shift+End |
| Select All | Ctrl+A |
| Boldface | Ctrl+B |
| Italic | Ctrl+I |
| Underline | Ctrl+U |
| Left Aligned | Ctrl+L |
| Center | Ctrl+E |
| Right Align | Ctrl+R |
JAWS quick reference
JAWS for Windows is a screen reader: it reads the screen aloud and lets people who are blind use a computer from the keyboard.
Desktop keystrokes
| Action | Keystroke |
|---|---|
| Say Character | Num Pad 5 |
| Say Prior Character | Left Arrow |
| Say Next Character | Right Arrow |
| Say Word | Insert+Num Pad 5 |
| Spell Word | Insert+Num Pad 5 twice quickly |
| Say Prior Word | Insert+Left Arrow |
| Say Next Word | Insert+Right Arrow |
| Say Line | Insert+Up Arrow |
| Spell Line | Insert+Up Arrow twice quickly |
| Say Prior Line | Up Arrow |
| Say Next Line | Down Arrow |
| Say Sentence | Alt+Num Pad 5 |
| Say Prior Sentence | Alt+Up Arrow |
| Say Next Sentence | Alt+Down Arrow |
| Say Paragraph | Ctrl+Num Pad 5 |
| Say All | Insert+Down Arrow |
| Action | Keystroke |
|---|---|
| Interrupt Speech | Ctrl |
| Say Window Title | Insert+T |
| JAWS Find | Insert+Ctrl+F |
| JAWS Find Next | Insert+F3 |
| Say Selected Text | Insert+Shift+Down Arrow |
| Action | Keystroke |
|---|---|
| Screen Sensitive Help | Insert+F1 |
| Keyboard Help (on/off toggle) | Insert+1 |
| JAWS Help for Applications | Insert+F1 twice quickly |
| Hot Key Help | Insert+H |
| Window Key Help | Insert+W |
| Action | Keystroke |
|---|---|
| Open Combo Box | Alt+Down Arrow |
| Close Combo Box | Alt+Up Arrow |
| Action | Keystroke |
|---|---|
| Window List Dialog | Insert+F10 |
| Minimize All Applications | Windows+M |
| Restore Normal Voice Settings | Insert+Esc |
Internet Explorer 5 and 6 keystrokes
| Action | Keystroke |
|---|---|
| Move through the page | Up Arrow and Down Arrow, Page Up, and Page Down |
| Move to Address Bar | Alt+D |
| Go Back a Page | Alt+Left Arrow |
| Next Link | Tab |
| Prior Link | Shift+Tab |
| Open Link | Enter |
| List Links | Insert+F7 |
| List Headings | Insert+F6 |
| Action | Keystroke |
|---|---|
| Skip Past Links | N |
| Next Heading | H |
| Prior Heading | Shift+H |
| Next Frame | M |
| Prior Frame | Shift+M |
| JAWS Find Next | F3 |
| Action | Keystroke |
|---|---|
| Next Form Control | F |
| Prior Form Control | Shift+F |
| Enter Forms Mode | Enter |
| Exit Forms Mode | Num Pad Plus |
| Move between form controls while in Forms Mode | Tab |
| Action | Keystroke |
|---|---|
| Next Table | T |
| Prior Table | Shift+T |
| Next Row | Windows+Down Arrow |
| Prior Row | Windows+Up Arrow |
| Read Row | R |
| Read Column | C |
| Next Cell in Row | Alt+Ctrl+Right Arrow |
| Prior Cell in Row | Alt+Ctrl+Left Arrow |
| Read Current Cell | Alt+Ctrl+Num Pad 5 |
| Action | Keystroke |
|---|---|
| Increase Rate (During SayAll) | Page Down |
| Decrease Rate (During SayAll) | Page Up |
| Increase Rate (not in SayAll) | Alt+Ctrl+Page Down |
| Decrease Rate (not in SayAll) | Alt+Ctrl+Page Up |
| Restore Normal Voice Settings | Insert+Esc |
MAGic quick reference
MAGic is screen magnification software with speech, for people with low vision.
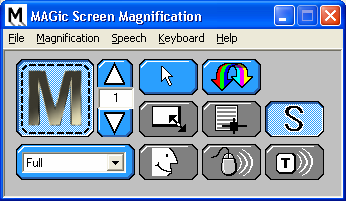
Toolbar buttons
Keystrokes
| Action | Keystroke |
|---|---|
| Minimize/Restore the MAGic User | Caps Lock+Num Pad Asterisk |
| Refresh Screen | Caps Lock+Esc |
| Action | Keystroke |
|---|---|
| Magnification Toggle On/Off | Caps Lock+Delete |
| Increase Magnification | Caps Lock+Num Pad Plus |
| Decrease Magnification | Caps Lock+Num Pad Minus |
| Switch between Magnified Views | Caps Lock+Num Pad Slash |
| Toggle Color Enhancements On/Off | Caps Lock+F12 |
| Action | Keystroke |
|---|---|
| Tracking (Toggle On/Off) | Caps Lock+R |
| Reposition Mouse | Caps Lock+Num Pad 5 |
| Locator (Toggle On/Off) | Caps Lock+F10 |
| Pan | Caps Lock+Arrow keys |
| Stop Pan | Caps Lock |
OmniPage quick reference
OmniPage uses optical character recognition (OCR) to turn a scanned page into text that a screen reader or magnifier can use.
Using OmniPage from Microsoft Word
- Open Microsoft Word and begin working in a document.
- Place the page face down in the scanner.
- Verify the correct settings by going to the File menu item Acquire Text Settings (this only has to be done once).
- Under the Format tab:
- Choose Auto for the input format.
- Choose Retain font and paragraph formatting for the output format.
- Under the Direct OCR tab:
- Check Draw zones automatically.
- Uncheck Proofread OCR (if proofing is specified, it will follow recognition).
- Select Scan B&W in the Image Source combo box.
- Note: Any settings not offered take their values from those last used in OmniPage Pro (see Settings to check within OmniPage).
- Under the Format tab:
- Go to the File menu item Acquire Text to scan a document.
- The recognized text is placed at the cursor position in your Microsoft Word document.
Scanning within OmniPage
- Open OmniPage.
- Verify the correct settings (see Settings to check within OmniPage).
- Go to the View menu (Alt+V), then OmniPage Toolbox. Select OCR Wizard.
- Go to the Process menu (Alt+P). Select Start. This will open a dialog box which will walk you through 6 steps. After choosing the desired settings on each page, select Next.
- Step 1: Choose whether you would like to scan in Black and White, Grayscale or Color (or choose to perform OCR on an image file).
- Step 2: Choose what the original document is like. Let OmniPage Pro decide (auto) is the recommended setting.
- Step 3: Choose the OCR method. More Accurate is the recommended setting. You can also identify the languages that the document contains. English should be selected by default.
- Step 4: Choose the level of formatting to retain from the original document. I want to retain font and paragraph formatting is recommended.
- Step 5: Choose whether to proofread the finished text. No is the recommended setting. You can also choose whether to apply IntelliTrain or not.
- Step 6: Choose whether to save the finished file, or copy it to the clipboard and select Finish. If you have chosen Save it as a file on my computer, you will be prompted for a file name and location after scanning and recognition is complete.
Settings to check within OmniPage
- Open OmniPage.
- Go to the Tools menu, then Options, and select All.
- Under the Direct OCR tab:
- Check Enable Direct OCR.
- Check Draw Zones Automatically.
- Uncheck Proofread OCR.
- Under the Process tab:
- Check Automatically Correct Page Orientation.
- Under the Proofing tab:
- Uncheck Automatically proofread results after OCR.
- Under the Custom Layout tab:
- Set Flowing text to Auto.
- Set Tables to Auto.
- Set Graphics to No Graphics.